Day 1 – 10 October 2025, Friday
I woke up at 6:00am this morning, went to the Sky Spa to wash up, showered and had a quick soak in the onsen before returning to my room for breakfast. The five-minute dip really warmed up the body and woke me up, so I tried to do it in the following days whenever possible. A good night of uninterrupted sleep and the morning soak left me refreshed and ready for the upcoming task today.


Breakfast comprised of the egg mayo sandwiches I bought from FamilyMart last night, and drip coffee that I obtained from Reception at Candeo Hotels (you can request it for free). I checked the weather forecast and it looked good. The temperature at 7:00am was 19 degrees, forecast to reach a high of 26 degrees in the afternoon and remain sunny all day. Perfect conditions for cycling.
After finishing my breakfast, I suited up for my ride. I put on my official Shikoku Challenge cycling bib and jersey, slipped on my arm sleeves, cycling gloves, sunglasses, cap, helmet, socks and shoes. When I stood in front of the mirror, I was pleased with what I saw. I was ready and raring to go. I wheeled my Gravier bike and suitcase out of the room, and headed to Reception to check out. As I will be returning to the same hotel after completing the Shikoku Challenge, I deposited my suitcase with Reception, promising to return 11 days later to collect it.

From Candeo Hotels, I cycled to the Ehime Prefectural Office, just a short 2-minute ride away. In front of the main building is a 0km marker on the ground. That marks the official starting point of the Shikoku Challenge. I asked a passer-by to help me take some photos but they weren’t satisfactory, so I set up my selfie stick/tripod stand and took some more pics and videos to capture the momentous occasion.


After many months of preparing for it, the time had finally come. I switched on the Strava app on my Apple Watch and also the Mi Fitness app on my Redmi Watch. I used two watches to log my ride, as a backup in case one of them failed. At 8:00am, I officially kicked off my Shikoku Challenge. Let’s go!
As I cycled out of the Ehime Prefectural Office compound, I felt a great sense of anticipation of what was to come – 11 days of cycling, covering 1,000km around the entire Shikoku island. Best of all, I will be on my own for this whole duration. I wasn’t afraid or nervous because I knew I had done all the necessary preparations; I was simply excited to begin this adventure.

The first day was spent figuring out how everything worked, getting used to my gear and settling into the groove of cycling. For the Shikoku Challenge, we cycle around the island in a clockwise direction. It is left-hand drive in Japan (same as Singapore) so cycling clockwise ensures we will be in the same direction as traffic. Most importantly, it means we will cycle right beside the coast, which gives us better views.
The itinerary for Day 1 of the Shikoku Challenge is to cycle from Matsuyama to Imabari. The distance is only 47.1km and the elevation gain is 214m, the shortest distance and least elevation gain among the 11 days. Hence, today’s ride is really a warm-up ride to ease me into the Challenge.
To navigate my way, I used Google Maps on my iPhone, which I mounted onto the handlebar of my bike using the Quad Lock mount and case. The Shikoku Challenge website (click here) provides the official route with all the roadside station checkpoints and locations of partner hotels, restaurants and bicycle shops marked out. When you open the webpage on your phone, it should also automatically open up your Google Maps app and display the official route. Each day’s route is marked with a different colour.

However, it is not a GPX (GPS Exchange Format) file that you can download or load into your bicycle navigation app like Ride With GPS or Velodash. Thus, there are no voice or visual prompts to help you navigate so you need to be able to read Google Maps and have a good sense of direction.
But if you’re not good at reading Google Maps or if your mobile phone has run out of battery, don’t worry. There are route markers painted on the ground to show you the way. Look out for the blue and white markings painted on the left side of the road. They will say “Round Shikoku” followed by the name of the next destination. For example, “Round Shikoku Imabari”, with the corresponding Kanji/Chinese characters “四国一周今治” above it. The markers will point the direction you should be cycling towards. Note that some of the markers will also indicate other popular cycling routes. So, always look out for the one that says “Round Shikoku”.

Unless stated otherwise, you should go straight. At traffic junctions or intersections where you have to make a turn, the markers will also indicate the direction to turn to. After making the turn, there will usually be a small blue line with an arrowhead. This blue line is about one metre long and there are no words on it. Its purpose is to show that you are on the right course.

There are also distance markers every 5km for you to track your progress. All in all, navigation is not difficult and you don’t have to worry about getting lost. You might miss a turn sometimes, but check your Google Maps every now and then and you should be fine. I usually refer to the route on Google Maps when I am about to leave or approach a city because that’s when you encounter more traffic junctions and may have to make more turns. In the rural areas, the route is usually pretty straightforward as there is only one road, so you can switch off your phone’s display to save battery.
The roads in Shikoku are well maintained and there is usually a road shoulder about half-a-metre wide where you can cycle safely. In some of the busier and tighter areas, the road shoulder is non-existent so the vehicles will drive next to you. However, I found that the majority of Japanese drivers are very cautious and friendly towards cyclists. They will overtake only when it is safe to do so, and leave a wide gap in between. It is only the larger trucks that tend to get closer to you because of their vehicle’s larger body. But even then, I never felt that they were too close.

Cycling through tunnels can be a hairy experience because the sound of the vehicles passing through is amplified into a loud roar. Sometimes, it feels like a freight train is charging towards you, but after the vehicle has passed, you realise that it is just a small car. The longer tunnels usually have an elevated sidewalk that is separate from the road where you can cycle safely. The shorter tunnels don’t have them, so you’ll have to cycle on the same level as the vehicles. In such cases, just keep left as close to the kerb as possible, and cycle quickly to get through the tunnel. In my 11 days of cycling, the longest tunnel I encountered was 2,156m long – that took a while to get through.
Before entering a tunnel, always ensure that your (red) rear lights are switched on. It is also good practice to switch on the (white) front light as well because there may be a chance of someone cycling towards you. That happened only once for my 11 days so it’s a very rare occurrence, but in any case, make it a habit to switch on both the front and rear lights when you cycle through a tunnel.
After figuring out the system, I was able to enjoy the ride. The route was pretty flat as I cycled out of Matsuyama city, with a small climb followed by my first tunnel experience. At about 9:30am, I hit the coast for the first time and paused to take in the view. The water in the sea was clear and it felt so tempting to run onto the white sandy beach to take a quick dip in the cool water. There was even a shop selling Blue Seal ice-cream, which brought back memories of Okinawa.


Just five minutes later, I reached the first checkpoint, the roadside station at Kazahaya-no-Sato Fuwari. I had covered about 20km so far, after 1½ hours of leisurely cycling. Roadside stations are where you can find a restroom, a retail shop selling local products and souvenirs, a restaurant selling cooked food or snacks and maybe a farmer’s market or supermarket. For the Shikoku Challenge, roadside stations also serve as checkpoints where you collect your stamps for the Official Challenge Pass.

For most of the roadside stations, the stamp can be found inside the retail shop. I walked around the shop and located the countertop with the stamp and inkpad. They are always accompanied by a small standee with the official Shikoku Challenge logo so it’s easy to spot. I pressed the square-shaped stamp on my Challenge Pass and opened my account, so happy. Many more stamps to collect!


I usually buy fridge magnets from the places I visit, but it’s not practical to do that on the Shikoku Challenge because of limited storage space and the need to travel light. My friend FA had given me the terrific idea to collect stickers instead as they are light and easy to keep.
Some of the roadside stations sell emblem and route stickers bearing the name of the roadside station or the highway route they are located at. They are like sticker versions of fridge magnets so they’re great substitutes. The stickers cost 300 yen (S$2.60) each. This roadside station had a few designs available so I bought two different ones. However, I would find out in the subsequent days that not all the roadside stations carry the stickers, so I just bought them whenever they were available.


With the official business completed, I took a longer break since there is only one checkpoint for today and I was progressing well. I bought a can of cold coffee from the vending machine and munched on a bar of Kit Kat chocolate. Pro tip: always carry some 100 yen coins or 1,000 yen notes with you as not all vending machines accept credit cards. Most canned or bottled drinks are priced below 200 yen, which is really affordable.
You’ve probably heard that trash cans are rarely found in Japan and that is true. You might have to carry your trash with you until you reach your hotel or perhaps a konbini like Lawson or FamilyMart to dispose them. However, there are always bins beside the vending machines for you to dispose your cans or plastic drink bottles. These are for recycling purposes so please don’t throw your trash in these bins.

After leaving the roadside station, the route mostly hugged the coastline, which was really lovely. The weather was beautiful, the sky was mostly cloudless and the breeze coming from the ocean made it even better. I was enjoying it so much. However, my nose was not cooperating as I was having the sniffles and I kept having to pause to clear the blockage from my nose.


At around 11:00am, it started to get hot and I felt a bit low on energy so I opened my packet of GU Chews and ate the first cube for a small boost. GU Chews is like an energy gel but in the form of bite-sized gummies. Each pack contains multiple chews so you can tailor your intake and eat as many cubes as necessary; you don’t have to finish the whole packet at one go.


After cycling a little more, I soon came across as small wooden hut by the roadside, with red banners fluttering in the wind. It looked like it sold food so I stopped on a whim to check it out. Turns out it sells takoyaki. I paid 400 yen (S$3.50) for a box of 8 pieces. OMG they were so good! Fresh, hot and crispy, with a nice slather of takoyaki sauce, seaweed flakes and bonito flakes. This was an unplanned stop and discovering it made it all the more wonderful. It came at the perfect time and was just what I needed. With 33km done, I now have energy for the remaining 15km!


Actually, my final distance for today will be longer than the official 47.1km because I decided to make a detour to visit the Kurushima Strait Observatory since I was doing well in terms of time and also because it’s a short ride today. At Onishi town, I deviated from the official route and headed north towards Hashihama.
An observation point is always located somewhere high, which means there will be elevation, which also translates to working harder to get there. It was quite a long climb, with an average of 3% gradient over 1.1km. However, as I got closer, I saw the circular ramp and it got me very excited.


At 12:40pm, I arrived at the Kurushima Strait Observatory and the Kurashima Kaikyo Bridge came into view. It was one of those moments that make you subconsciously say “wow”. Set against the perfectly blue sky and rising stoically above the Seto Inland Sea, the bridge looked very impressive and really did take my breath away.
Completed in 1999, the Kurashima Kaikyo Bridge was the world’s longest suspension bridge structure, with a total length of 4,015 metres. It consists of three successive suspension bridges with six towers and four anchorages. It looks similar to the Golden Gate Bridge in San Francisco but it is white in colour.


The bridge connects Shikoku to the island of Oshima. But more than that, the bridge is the gateway of the Shimanami Kaido on the Shikoku side. Shimanami Kaido is one of Japan’s six National Cycle Routes (click here). It is perhaps Japan’s most famous cycling route, and increasingly renowned around the world as well. It is a 70km cycling route connecting Imabari in Shikoku and Onomichi in Honshu, the biggest of the four main islands in Japan. Onomichi is a city in Hiroshima Prefecture.
The Shimanami Kaido (click here) is famous because of the stunning scenery and ocean views. The cycling route traverses six islands dotting the Seto Inland Sea, with natural beauty of the islands combined with the structural beauty of the bridges linking those islands. The 70km route can be completed in a day, with ample opportunities to visit temples, castles and cafes along the way.


If what I see here at Kurushima Strait Observatory is any indication of the scenery I can expect on the Shimanami Kaido, I am very sure I will enjoy it tremendously. I don’t have time to do it on this trip, but hopefully I can return one day in the future to experience it.


I took an extended break here to snap many photos and have a drink. After leaving the Kurushima Strait Observatory, I cycled past the path that led to the Shimanami Kaido, so I decided to follow it just for fun. The path brought me to the circular ramp that I saw earlier, which eventually led to the Kurashima Kaikyo Bridge.
It was so awesome to cycle on the bridge. The view was stunning as the towers holding the suspension cables appeared even larger up close. With the wind in my face, the sound of the cars driving past and the stunning blue ocean below me, it was an exhilarating experience. I didn’t dare to cycle past the first tower because I was afraid I might be tempted to keep going, so I turned back reluctantly. But what a thrill it was.

On the way back, I saw the sign for Sunrise Itoyama so I decided to check it out as well. Upon arrival, I found out that Sunrise Itoyama is a cycling terminal catered to those doing the Shimanami Kaido. It comprised of a hotel, restaurant, bike rental service and facilities for cyclists. The hotel lobby had a great view of the Kurashima Kaikyo Bridge. I thought I could get a coffee here but there was only a restaurant, not a café. The restaurant looked quite proper (i.e. expensive) so I decided not to sit here for a drink.


As I walked further, I saw the cycling terminal facility. This is where you can rent a bicycle and start cycling the Shimanami Kaido route. Upon completing the Shimanami Kaido, you can return the bicycle at Onomichi or other terminals along the route. Likewise, you can rent a bike from the cycling terminal at Onomichi and return the bike here at Imabari.


Hence, it is possible for those who are attempting the Shikoku Challenge to also do the Shimanami Kaido in the same trip. You just need to set aside an extra day or two in Imabari to do so. Rent a bicycle here at the Imabari City Cycling Terminal first thing in the morning. Upon completing the Shimanami Kaido, return the bicycle at the Onomichi Cycling Terminal and catch the bus back to Imabari. However, there is no direct bus so you’ll need to either do a bus transfer or a ferry transfer. It is therefore possible to fit the Shimanami Kaido into the Shikoku Challenge, but it requires careful coordination for the bus/ferry timings if you want to get back to Imabari within the same day.


Beside the cycling terminal, there was a photo spot with SHIMANAMI in big letters and the Kurashima Kaikyo Bridge in the background. Even though I wasn’t participating in the Shimanami Kaido this time, I took a photo with it. Really hope I can come back one day to do it.
I left Sunrise Itoyama at about 1:45pm. But before heading to my hotel, I had one more place to go. Half an hour later, I arrived at the Imabari Towel Honten (main store) located opposite Fuji Grand Imabari shopping mall. I bookmarked this place a few months ago so I forgot what it really was. I thought it was the museum but it was not; it was just a retail shop dedicated to selling Imabari towels. The Towel Museum is located rather far away (about 13km from the city centre) and not along the cycling route so I didn’t manage to visit it on this trip.


Imabari is famous for its towels, which are world renowned for their softness, water absorbency and durability. The soft water from the Sojagawa River is gentle to the yarn and the material of the towel, allowing delicate and bright colours while bringing out the natural softness of the cotton used. With a history of making towels for over 130 years, Imabari’s artisans have honed their skills in yarn handling, weaving and dyeing. Each towel is the result of utmost care and dedication.
Each Imabari towel must also pass the “five-second rule”, where the towel must sink within five seconds after it is placed on water. This is to guarantee the water absorbency that is characteristic of Imabari towels. Only towels that pass such standards can be branded as an Imabari towel, and be given the red, blue and white mark that is found on every Imabari towel.

The store was huge and it sold towels of all sizes and colours. As I only had limited space on my bicycle’s bags, I could only afford to buy three small face towels – for dad, mum and myself. I chose the design with the bicycle print, naturally. The towels cost 660 yen (S$5.75) each.


From the store, it was a short 15-minute ride to my hotel and I arrived at Shimanami Prime Hotel Imabari at 2:45pm. My Strava showed that I had cycled a distance of 60.8km today, with an elevation gain of 287m. Hence, the detour to Kurushima Strait Observatory and the Imabari Towel Honten added about 13km to my ride.


As it was still some 10 minutes to go before the official check-in time of 3:00pm, I sat at the lobby to rest. I noticed that hotels in Japan are quite strict about check-in time. In the meantime, I had my welcome drink – a cup of Asahi beer to reward myself for completing Day 1 of the Shikoku Challenge!

The hotel is bike-friendly. They have bicycle racks at the lobby but they also allowed me to bring my bike to my room. The room is considerably smaller than the one at Matsuyama yesterday but the bed is bigger. There wasn’t much space left after putting my bike in. Anyway, it’s only for one night so it’s ok.


After checking in, I went to the public bath to shower and have a quick soak in the onsen. There was no one at that hour so I had the entire bath to myself. Shiok! Feeling clean and refreshed, I headed out at 4:00pm to explore the city.


I was contemplating whether to visit Imabari Castle because it was a 22-minute walk away according to Google Maps, and it closes at 5:00pm. After considering for a moment, I decided to go for it. As I walked along the streets, I noticed that it was very quiet. The city centre had an air of neglect. Most of the shops in the main shopping arcade were shuttered.


Being in rural Japan, I realised just how noisy Singapore is. We’re always surrounded by people and activities. Here, besides the sound of traffic on the main road, the side streets where people live are really quiet, with the silence broken by the occasional car driving by. I hardly saw anybody else walking on the street.


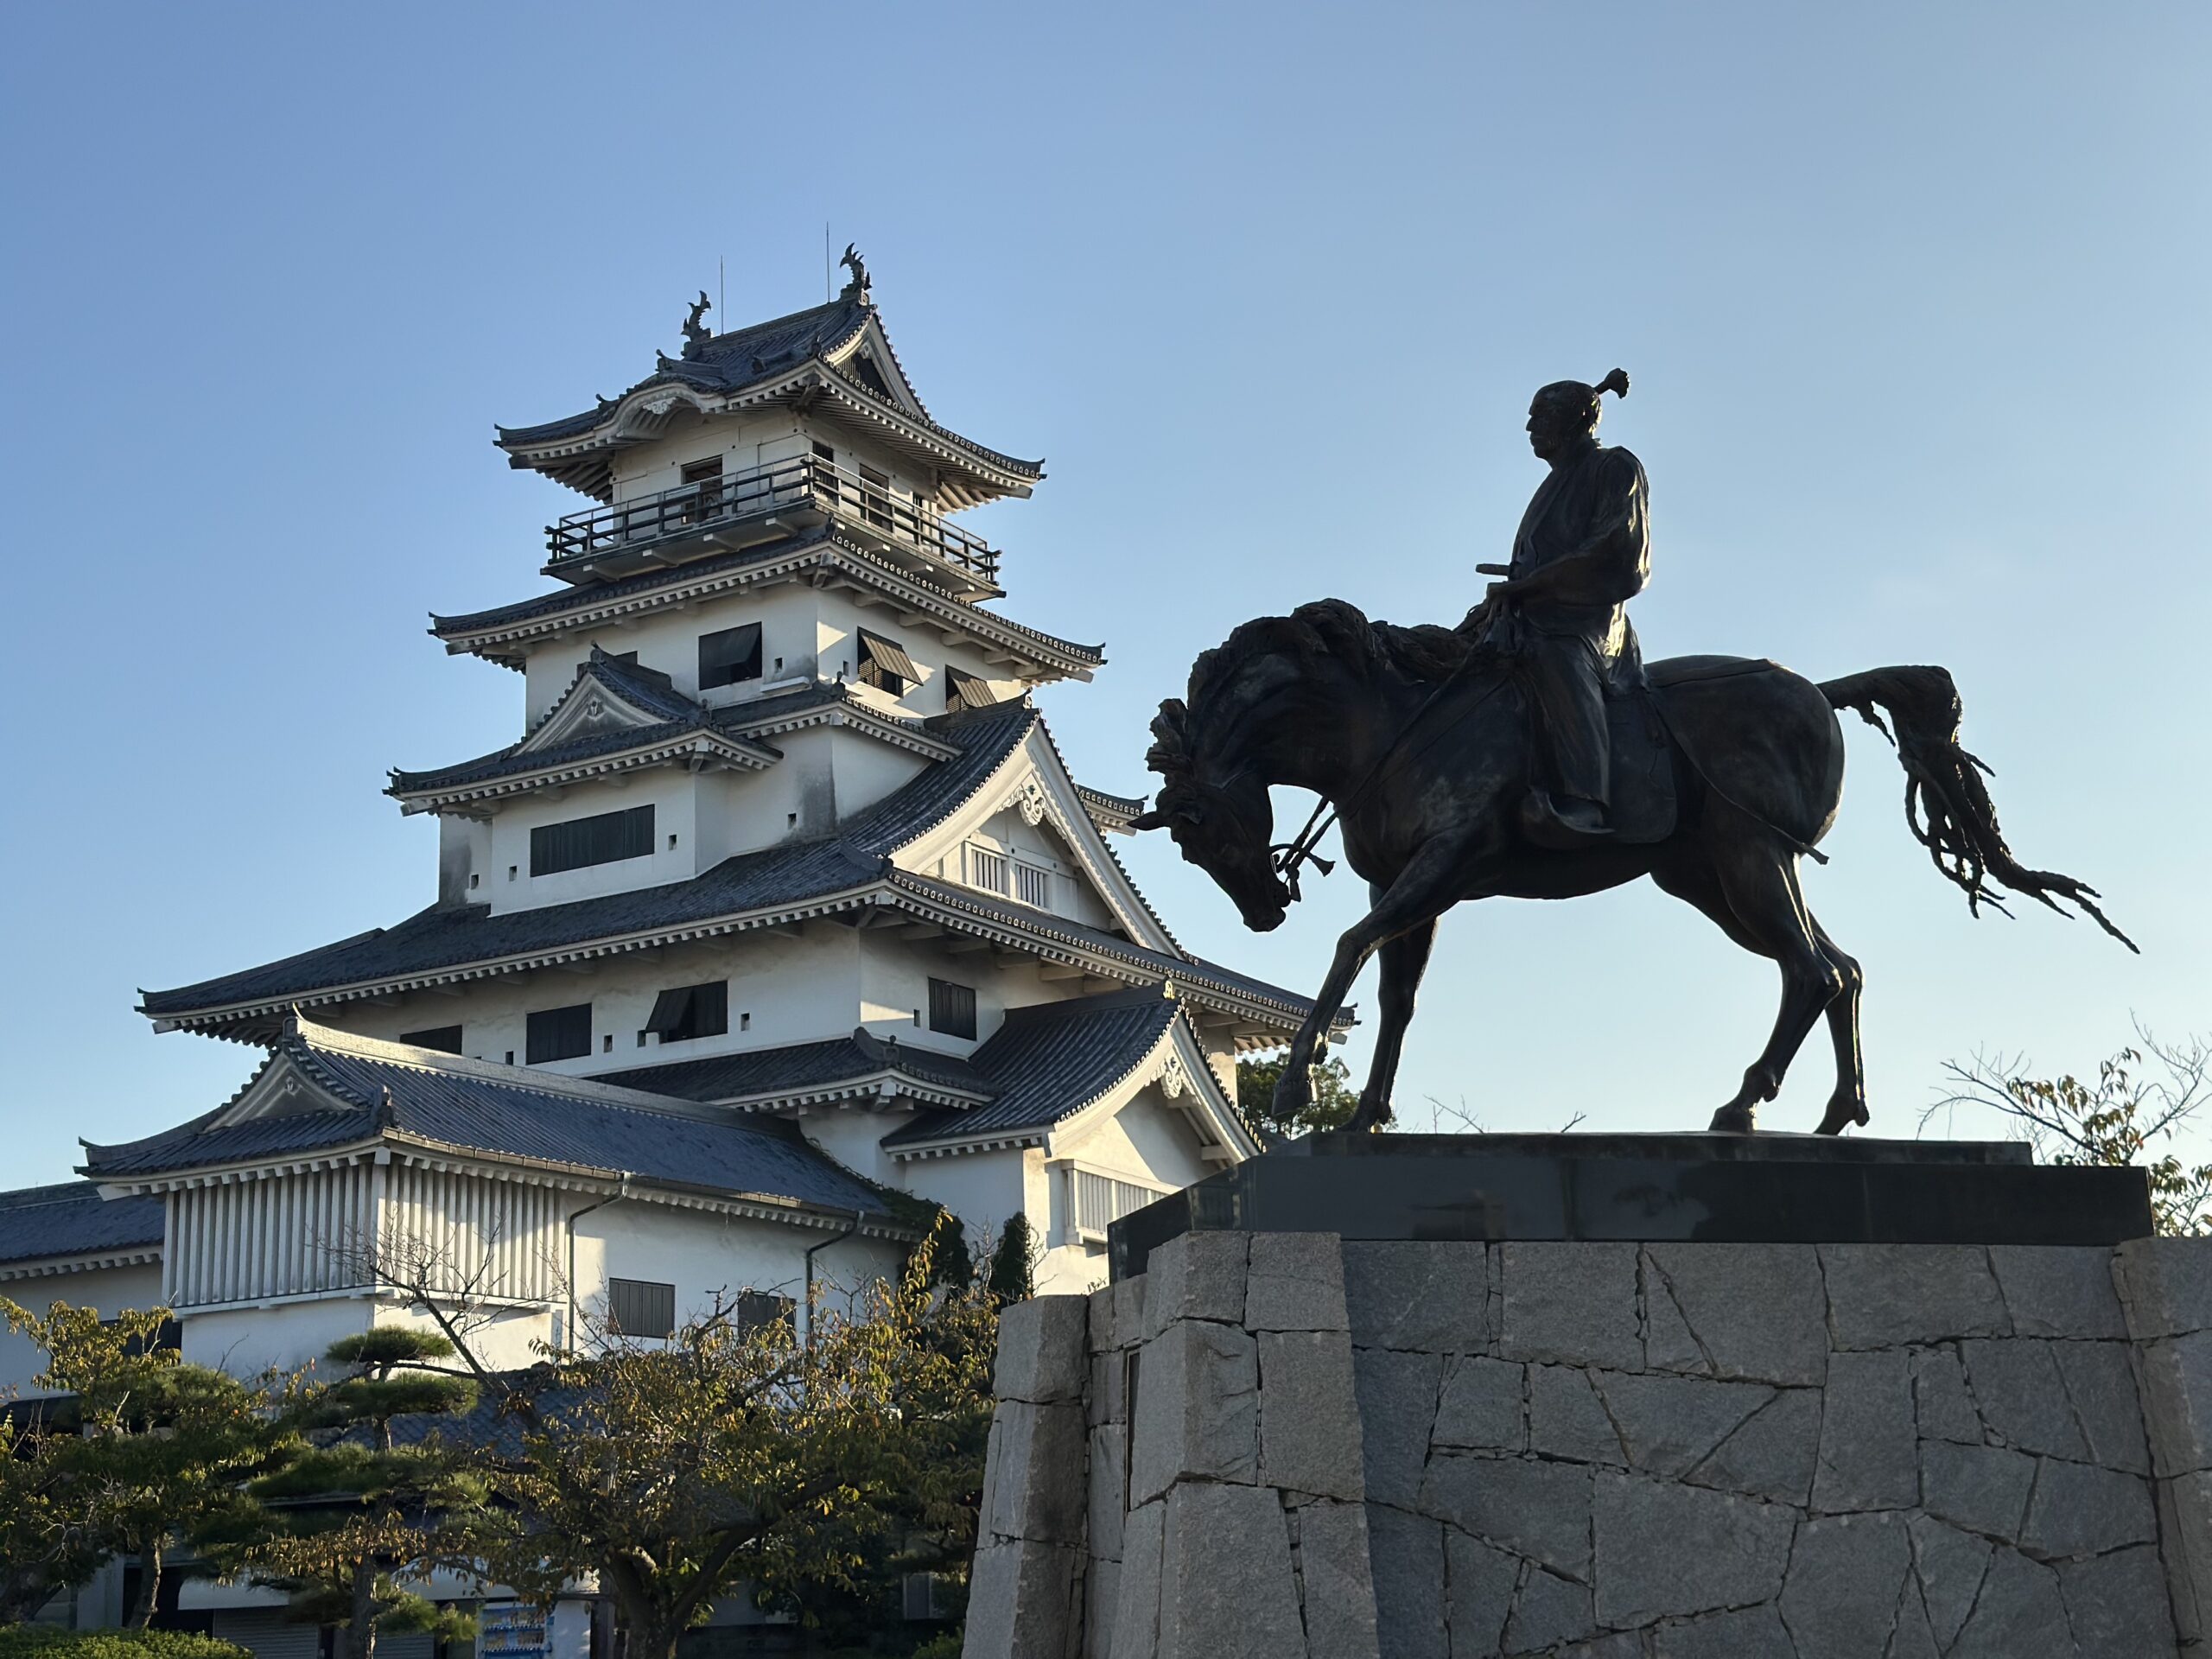
It took me less than 20 minutes to reach Imabari Castle. As I approached the huge moat, the castle came into view. It looked very grand and pretty in the soft evening light, and I knew it was the correct decision to come. I was surprised that the grounds were free entry; only the castle tower required an admission fee (520 yen for adults). I didn’t pay to enter the tower but there was plenty to see.


The castle was originally built in 1608 and it is one of the three castles on the sea as it is built right beside the harbour. Its moat is filled with seawater so the water level rises and falls with the tide. Only the moat and the inner stone walls remain almost completely intact today; the castle tower, turrets and gates are all reconstructed.


Besides the tower, there were also several Shinto shrines in the compound. A walkway comprising a series of closely-spaced red torii led to Fukiageinari shrine. Elsewhere, an equestrian statue of Todo Takatora occupied a prominent position, offering a magnificent photo opportunity with the tower in the background. Todo Takatora was a general and a famed castle builder during the Edo period.


Besides me, there were only a handful of other tourists so the whole place was very serene, greatly enhancing my experience. I spent about half an hour visiting Imabari Castle altogether. I’m happy I came to see it.
For dinner, FA asked me to try Yakibuta Tamago Meshi, the signature dish in Imabari. As usual, I did a search on Google Maps and found a restaurant nearby that had good reviews. After a short walk, I arrived at Hakurakuten restaurant at 5:05pm. It was almost empty when I first arrived but quickly filled up as dinnertime approached. I ordered the set for 1,300 yen, and a small cup of Kirin beer for 550 yen, total cost 1,850 yen (S$16). The set included the Yakibuta Tamago Meshi, Karaage chicken (fried chicken), soup and salad.


Yakibuta Tamago Meshi consists of rice (meshi) topped with slices of seasoned roast pork (yakibuta), two sunny-side up eggs (tamago) and a special sauce. When it was served to my table, it smelled amazing, largely due to the generous amount of pepper on top of the eggs. The rice was doused with sweet sauce and the pork slices were tender. I could see why it was so popular. It was actually a rather simple dish but it tasted like comforting, home cooked food. I was hungry because I didn’t have a proper lunch today (only the takoyaki), so this was a good meal for the day.


After the satisfying dinner, I walked to Kisuke no yu, located close to the Imabari train station. Kisuke no Yado/Kisuke no Yu is a capsule hotel/onsen facility that is very popular with cyclists doing the Shimanami Kaido. FA stayed here when he did the Shikoku Challenge last year, and recommended me to stay here too. Unfortunately, it was fully booked so I booked Shimanami Prime Hotel Imabari instead. Nevertheless, I still wanted to check out the onsen here, which is open to public.


Admission fee was 800 yen, and I spent another 500 yen to rent a towel and pyjamas set, since I arrived empty-handed. Hotel guests can use the onsen for free, of course. The facility was very modern, with large seating areas with lots of manga books available for guests to read for free. The locker room was also very big.


There was a variety of different baths – high-concentration carbonated bath, carbonated electric bath (I could feel some light electric currents, which was weird), walking bath, rock bath, standing jet bath, cold bath and more. My favourite was the sleeping bath, where I could lie down and relax, a great way to soothe my muscles after a day of riding. There were also a few saunas but it was too hot to stay inside for long.

By the time I left Kisuke no Yu, it was already very dark outside and there was nothing else to see in Imabari so I walked along the quiet streets back to my hotel, arriving at 7:45pm. I prepped my stuff for tomorrow’s ride and reflected on Day 1. A great start to the Shikoku Challenge, with 10 more days of cycling to go. Hope for more good weather and scenery!